 Composting offers several benefits:
Cost Savings – Composting reduces your need for trash bags, saving you money.
Nutrient Preservation – By composting, you can return valuable nutrients to the soil, benefiting your plants, flowers, and trees instead of discarding them as waste.
Landfill Space Conservation – Food waste comprises approximately 20% of all disposed trash in Massachusetts. Yard waste is banned from disposal by the Massachusetts Department of Environmental Protection. Composting food waste and yard waste helps save valuable landfill space.
Gardening Benefits – Provides gardeners with free compost!
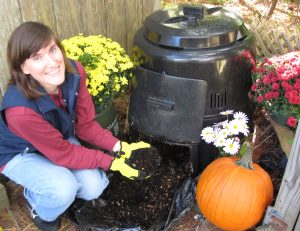
 The District sells two types of compost bins – the Earth Machine and the New Age Composter. Please see a comparison of the two bins here.
To purchase a compost bin, please follow these instructions:
- New Bedford and Dartmouth residents only, ID required.
- Both types of bins cost $25 each. Cash (exact amount preferred), check, or money order only. No credit or debit cards. The cost of each backyard compost bin is being subsidized by the two communities to encourage backyard composting.
- Hours: Monday – Friday, 7:15 a.m. – 3:00 p.m. and Saturday 8:00 a.m. – 10:45 a.m. at the landfill scale house.
- Address: 300 Samuel Barnet Blvd, New Bedford, MA 02745. Please go to the scale house.
 The EPA gives detailed guidance for backyard composting here. Below are general guidelines to get you started:
- Purchase or make a compost bin.
- Find a container for collecting compostable materials in the kitchen such as a pot with a lid, a bowl, or a pail.
- What to add to a compost bin
“Brown” materials are rich in carbon and include: leaves, twigs, pieces of brown paper bags, chipped brush, pine needles (pine needles should not make up more than 10% of the total material in the bin).“Green” materials are rich in nitrogen and include: fruit & vegetable scraps, coffee grounds, & grass clippings (untreated). Eggshells can also be added.
- Adding 50-75% “browns” and 25-50% “greens” provides a good balance. Too many brown materials can slow decomposition and too many green materials can cause odors.
- Do not add meat, bones, fat, grease, oils, peanut butter, dairy products, cooked foods with sauces or butter, dog & cat manure, diseased plants, weeds gone to seed, or weeds that spread by roots & runners (vines).
- Keep the materials as damp as a wrung-out sponge by adding water when necessary.
To speed up the decomposition process, you can turn the materials with a pitchfork or shovel regularly. This allows oxygen into the center and bottom of the pile, preventing odors.
Harvest your finished compost. The following is from: Composting At Home | US EPA
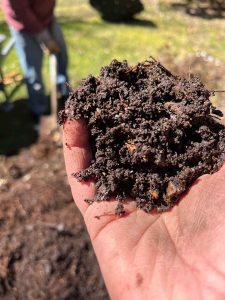
“When your compost pile is no longer heating up after mixing, and when there are no visible food scraps, allow your pile to cure, or finish, for at least four weeks. You can relocate the oldest compost at the bottom of the pile to a separate area to cure or stop adding materials to your pile. After curing, your pile will shrink to about one-third of its original size.
Compost in a well-maintained pile will be finished and ready for use in about three to five months. Left untended, a pile may take a year to decompose. The compost will look dark, loose, and crumbly and smell like fresh soil. Most, if not all, of the materials that went into the compost pile should be decomposed.
Screen or sift your finished compost to filter out materials that didn’t break down – twigs, fruit pits, eggshells, and items like produce stickers and plastic. (You can make a homemade screener out of ¼ inch hardware cloth.) Pits, eggshells, etc. that you sifted out can be added back into the active pile or to a new pile.”